Tuesday, 24 February 2015

Use of Summary update option ‘Invoice Account’ in AX2012

Use of Summary update option ‘Invoice Account’ in AX2012

AXAX

In a scenario where you want to update multiple SO/PO at one go but against their respective invoice accounts, there is a feature provided in Ax 2012.
In the following example; we have 4 sales orders for Invoice posting and of these four, two have one invoice account specified for them and the other two have another invoice account specified for them. If you perform an Invoice account summary update for the orders, two updates are created, one for each invoice account.
There are following 4 SO our of which 2 having one invoice account and rest 2 have different invoice account;
All the 4 SO are in Delivered state and ready for Invoice posting;
Multiple Invoice Acco


  • Select any of four SO and click menu button ‘Invoice’
  • System opens ‘Posting invoice’ form
  • Click ‘Other’ tab
  • Click drop down list of field ‘Summary update for’ and select value as ‘Invoice account’
  • Click button ‘Select’ and select all the 4 SO mentioned in above screen print
Posting Invoice_


  • Click button ‘Ok’
  • System does Invoice posting of all the 4 SO
Let’s confirm of how many invoice id got posted. As per explanation given above, there shall be 2 invoice ids update.
For SO-17 & 19 – Invoice id is same;
Same Invoice_


For SO-20 and 21 – Invoice id is same but different from the first one’
Same Invoice__


Monday, 23 February 2015

Distributor – Supplier Etiquette


Lately I have been thinking about Distributor-Supplier Etiquette; or should I say the lack there of.


As our industry accelerates through technology and demographic changes, we find ourselves with many new players on both sides of the distributor/supplier relationship. Training for supplier/manufacturer employees is directed toward products, customer types and factory programs instead of building a better channel.  In addition, the demographics in our industry are forcing generational interaction; so we find baby-boomers and millennials seated at the same table trying to communicate.


The chasm between partners widens; often based on simple lack of professional courtesies.  Miscommunications and friction between distributors and their upstream partners are building.  And, for some strange reason, nobody seems to be talking about it.

I want to bring this front and center.  To prime the pump, allow me to share a bit of the bad.

A Good Example of a Bad Example
Just a few weeks ago, I was invited to sit in on a distributor/manufacturer planning meeting.  The distributor had a long relationship with the manufacturer, and even though the distributor was producing strong sales results overall, a couple of key product lines were lagging.  Earlier in the year, the distributor and their supply partner had laid out an improvement plan.  For all intents and purposes, the plan had been a success; measurable results pointed to a significant turnaround.  I anticipated a positive working meeting to continue the efforts.

As we gathered in the conference, I couldn’t help but notice an air of nervous energy amongst the manufacturer’s people. The supplier’s local team members positioned themselves together on one side of the conference table, the distributor team members on the other (which is a topic unto itself.)  After a few social niceties, the supplier’s regional manager turned to the other group and bluntly stated, “We are here to understand what you are going to do for us in 2015.” After the distributor outlined 10 or so programs in place and plans to add more resources in the coming year, the regional manager said, “Good, put them on paper, and I will let you know if that’s enough.”

I couldn’t help myself, this was an expensive meeting with more than nine people in the room.   I held back as long as I could but had to ask, “Isn’t this about joint planning? Shouldn’t we discuss how we can make things work as a team?”  It was at that point the regional manager dropped the neutron bomb of distributor/supplier dysfunctional relationships.

“We are the ones who make the decision as to whether you are doing the right things.  Don’t forget who’s in charge here.  We are the manufacturer, you are the distributor.  We’ll tell you if you’ve got it right.”

While the words may not be dead-on accurate, they are mighty close.  The implication, tone and style conveyed the same meaning.  I could have suggested a hundred (maybe a thousand) alternatives.  The point is the comment was certainly not productive.  And, definitely not demonstrative of good etiquette.

I am interested in gathering your thoughts on distributor/supplier etiquette.   And, I am not being one sided. We are a team.   Distributors sometimes lack etiquette as well.  Respond with your favorite social faux pas.  We will reward the best one with a $25 Amazon Gift Card.


One time vendor account’ functionality in Ax 2012

One time vendor account’ functionality in Ax 2012

One time vendor concept is used to handle the suppliers with whom we transact once. A Separate sequence is maintained in Ax in order to not mixing them with regular vendors. Refer the setups;
  1. Assign a separate number sequence for one time vendors in AP @ Accounts Payable -> Setup -> Accounts payable parameters -> One-time supplier
  1. Select one time vendor @ Accounts Payable -> Setup -> Accounts payable parameters -> General
One time


When a new PO is created, select ‘One time supplier’ checkbox instead of selecting the vendor from vendor master. System will accept vendor address of the new supplier and assign him a new number sequence from the number sequence assigned in above mentioned setup.
The rest of the basic setups like terms of payment, method of payment, delivery terms will be picked from the vendor selected in setup 2.
It is to be noted that system keeps Vendor name blank & provides an option to users to keep the name of their choice.
Create PO


You can see this vendor in vendor master with one time supplier flag tick mark. This tick-mark will help you to house keep these records from vendor master periodically.
One time Supp.

Saturday, 21 February 2015

Creation and Posting of Sales orders in AX 2012

Creation and Posting of Sales orders in MS Dynamics AX 2012


Here I am going to explain normal Sales order posting in MS Dynamics AX 2012. when compared to earlier version of AX there are much changes in AX 2012 sales order process with respect to UI design and navigation as well.
Process is explained below with screenshots.
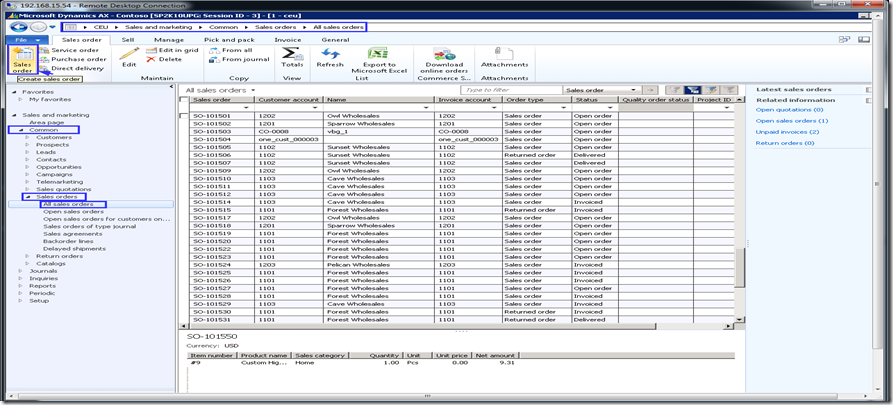
Navigate to module Sales and Marketing OR Accounts Receivable module —> Common –> Sales order—>All Sales order details—> Click Sales order icon in the Action pane, Sales order tab, New group.
1
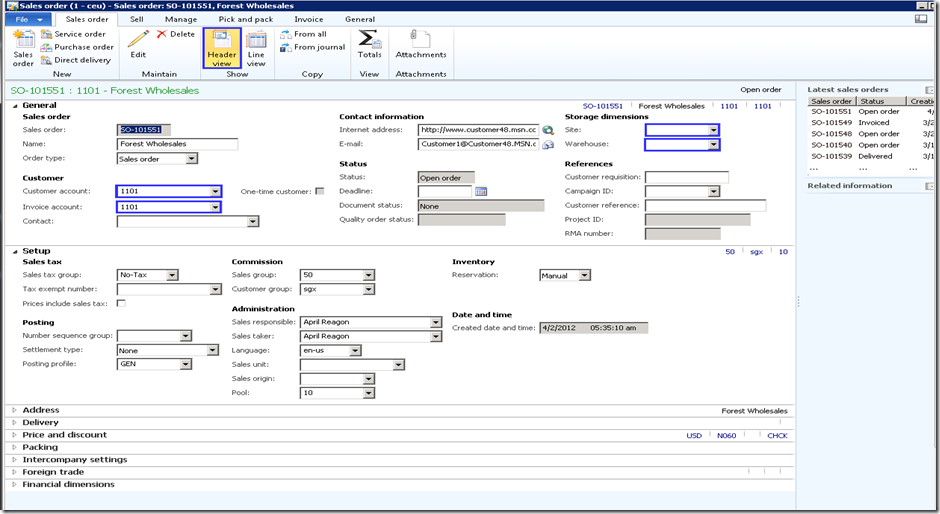
A new Create Sales order form is opened—> Select Customer account and fill relevant information in applicable fields—> Click OK at the bottom of the form.
Now Sales order header is created. Sales order form as two icons in action pane called Header viewand Line view in Sales order tab, in Show group as shown in below screenshot. Here we cannot see both Header and Lines, but we can see only one at a time.
2
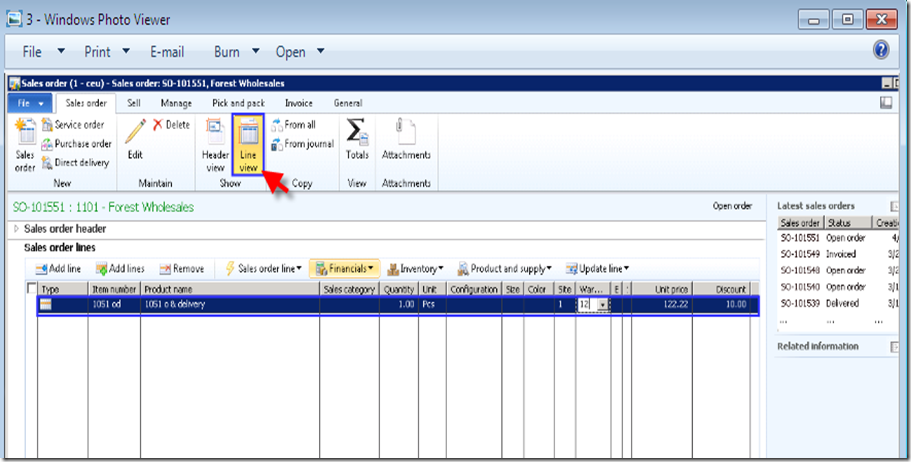
Now select Lines view and select Item in Sales order lines section. Enter Quantity and price.
image
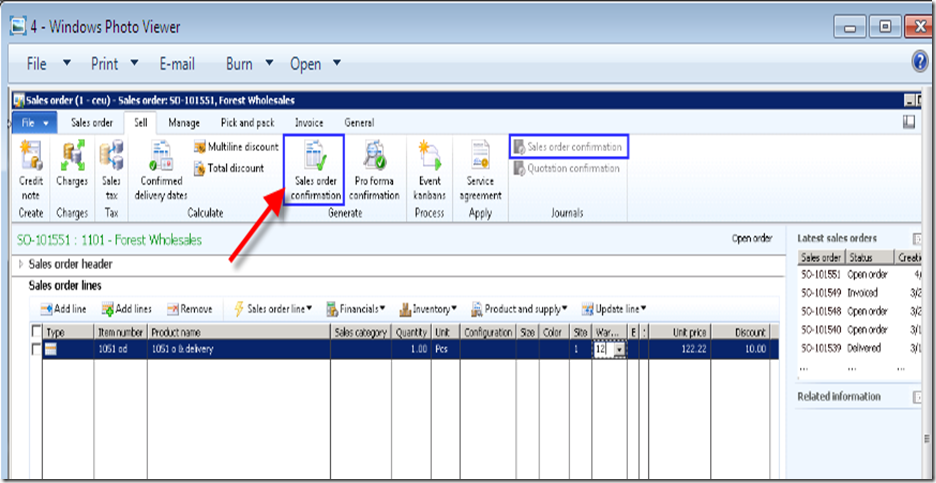
To Confirm the Sales order:
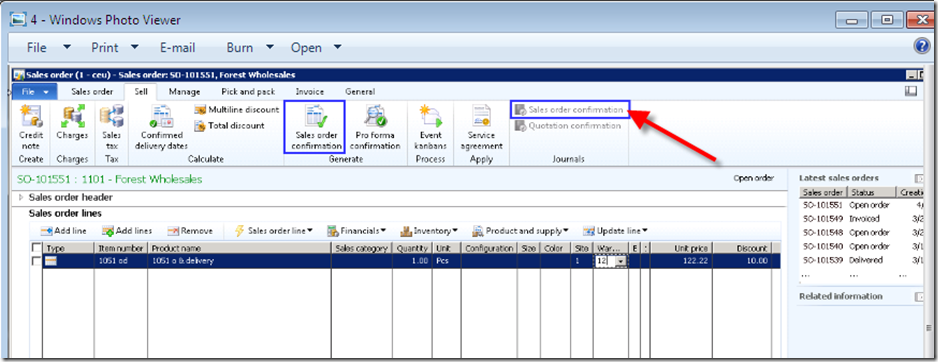
Go to Sell tab in Action pane of Sales order form —> Select Sales order confirmation Icon in Generate group as shown in below screenshot.
image

To view print preview of Sales order confirmation –> Click Sales order confirmation option or Icon in Journals group of Sales order action pane as shown in below screenshot. (This is enabled after posting Sales order confirmation only)
image

To post Picking list
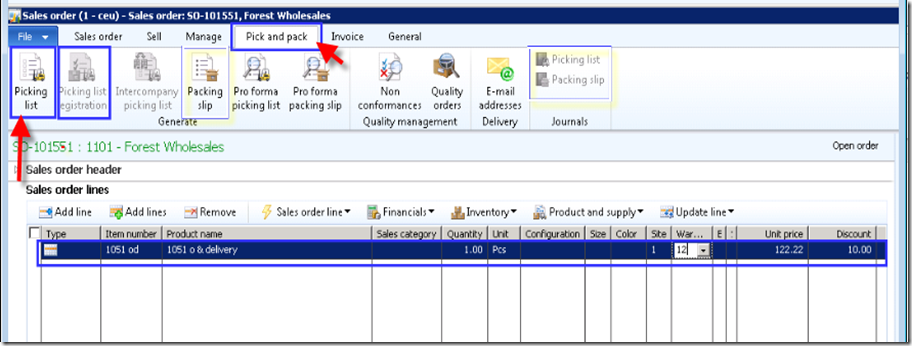
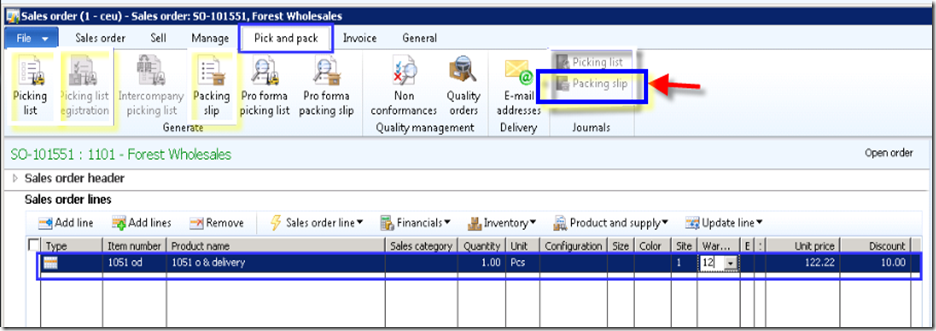
Go to Sales order form—> select Pick and Pack tab in action pane—> Click  Picking list icon in Generate group —> Posting Picking list form opens –> Click Ok button—> Sales order Picking list is posted.
To Post Picking list Registration
Go to Sales order form—> select Pick and Pack tab in action pane—> Click Picking list registration icon in Generate group —> Posting Picking list registration list form opens –> Click Ok button—> Sales order Picking list registration is posted.

image

To view print preview of Picking List and Picking list registration copy.
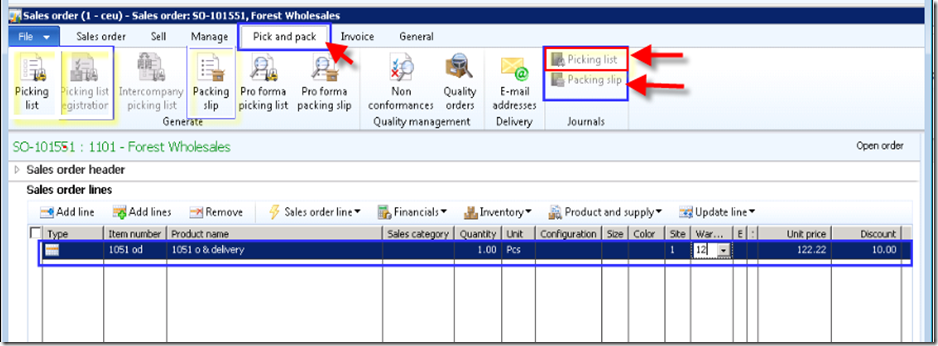
Go to Sales order form—> Pick and Pack tab in action pane –> Select Picking List or Packing slip as required in Journal group—> a new form is opened and click Print and Preview option –> Select any option as required in available option.
image
Post packing slip.
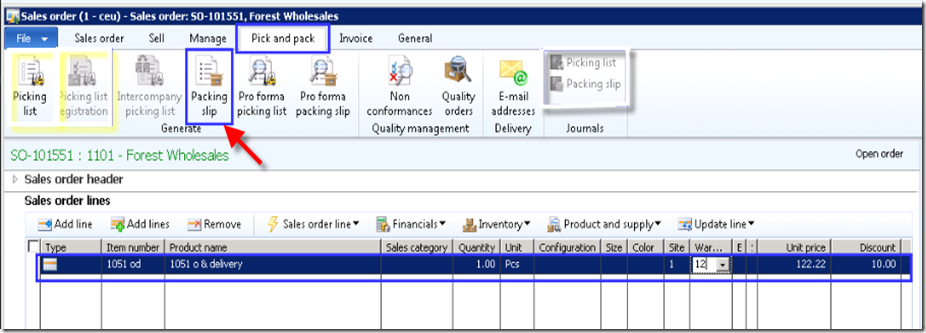
Go to Sales order form—> select Pick and Pack tab in Action pane—> select Packing slip  as shown in below screenshot—> Posting Packing slip form opens—>  –> Click Ok button.
image
To view print preview of Packing slip copy. Go to Sales order form—> Pick and Pack tab in action pane –> Select Packing slip  in Journal group—> Packing slip journal opens –> click Preview/print icon—> select Copy if you want to print copy of an invoice or Original if you wish to print the original Invoice.
image
Now final step in Sales order Posting Invoice
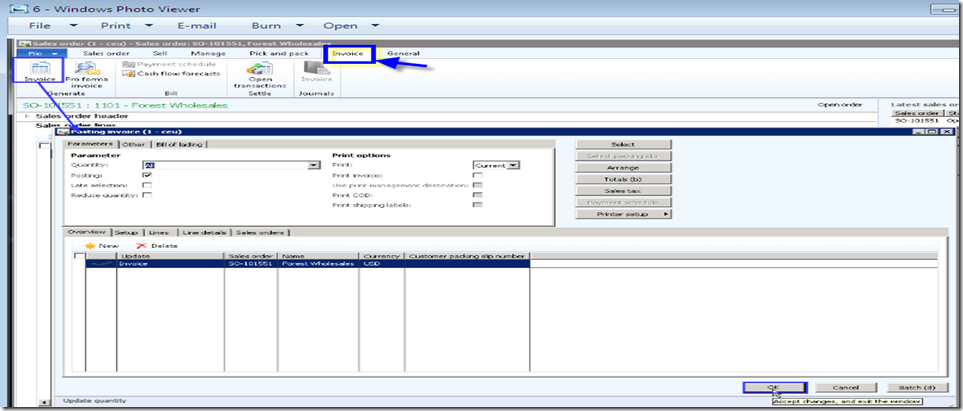
Go to Sales order –> Invoice tab in action pane—> select Invoice icon in Generate group –> Posting Invoice form is opened—> —> click  OK in bottom of the form—> Sales order Invoice is posted.
image
To view print preview of Invoice copy
Go to Sales order form—> click Invoice tab on action pane—>select Invoice option in Journals group—> Invoice journal form is opened –>select overview tab –> select Preview/ Print option—>select from Copy/original invoice as per your requirement—> preview the Invoice copy
image
Now we have covered all phases of Sales order like Confirmation, Picking list,Packing slip  and Invoice posting. This is a normal or simple Sales cycle of an item in AX 2012

Creation and Posting of Purchase order in AX 2012

Creation and Posting of Purchase order in MS Dynamics AX 2012

Here I am going to explain  normal Purchase order posting in MS Dynamics AX 2012. when compared to earlier version of AX there are much changes in AX 2012 with respect to UI design and navigation as well.
Process is explained below with screenshots.
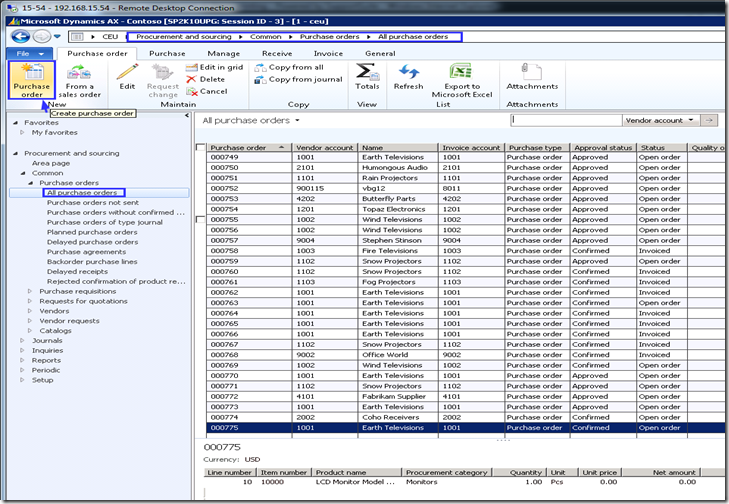
Navigate to Procurement and Sourcing OR Accounts payable module —> Common –> Purchase order—>All Purchase order details—> Click Purchase order icon in the Action pane, Purchase order tab, New group.
1
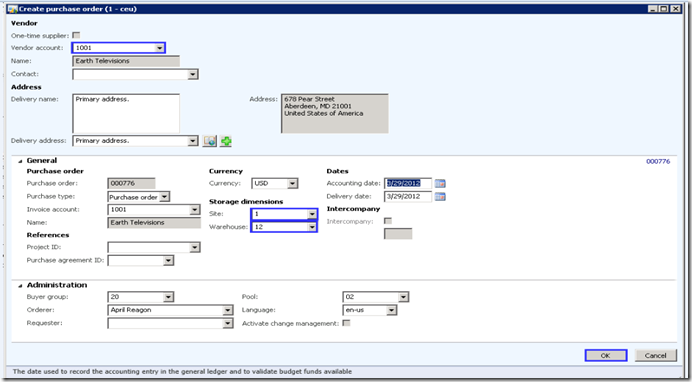
A new Create Purchase order form is opened—> Select Vendor account and fill relevant information in applicable fields—> Click OK as shown in below screenshot.
image
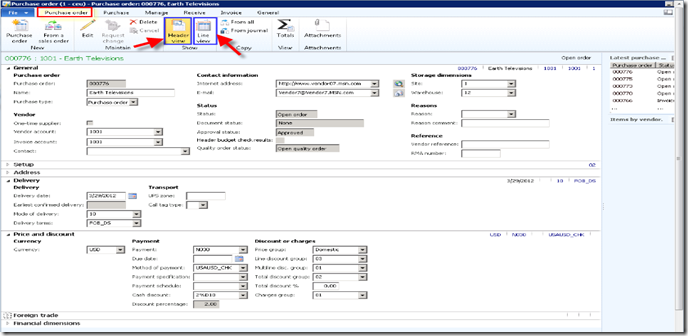
Now Purchase order header is created. Purchase order form as two icons in action pane called Header view and Line view in Purchase order tab, in Show group as shown in below screenshot. Here we cannot see both Header and Lines, but we can see only one at a time.
image
Now select Lines view and select Item in Purchase order lines section. Enter Quantity and price.
To Confirm the purchase order:
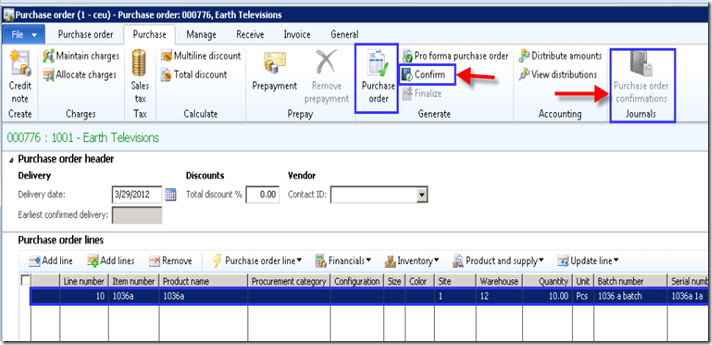
Go to Purchase tab in Action pane of Purchase order form —> Select Confirm Icon in Generate group as shown in below screenshot.
image
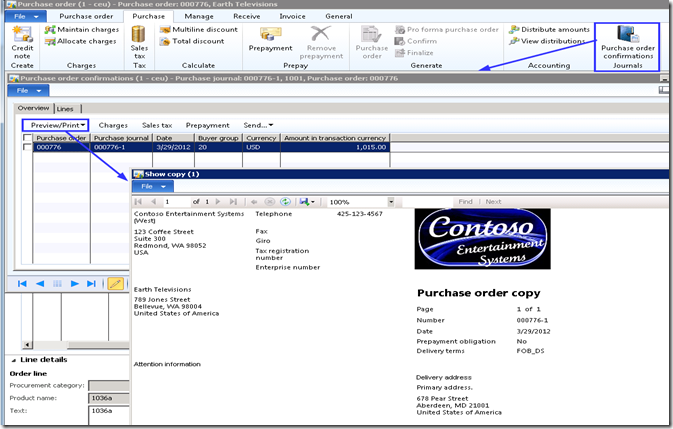
To view print preview of purchase order confirmation –> Click Purchase order  confirmation option or Icon in Journals group of Purchase order action pane as shown in below screenshot.
5
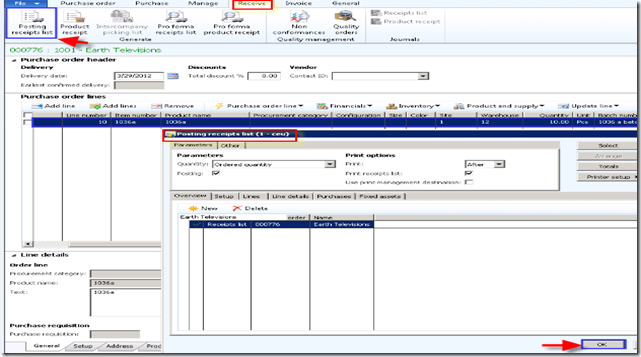
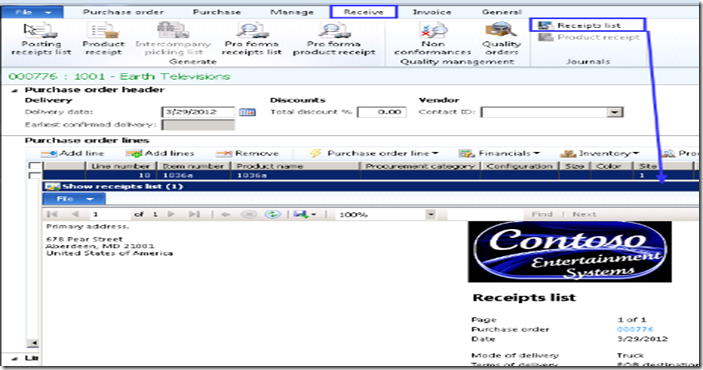
To post Receipt list
Go to purchase order form—> select Receive tab in action pane—> click Posting receipts list icon—> Posting receipts list form opens –> Click Ok button—> Purchase order Receipt list is posted.
image
To view print preview of Receipt List. Go to Purchase order form—> Receive tab in action pane –> Select Receipt list in Journal group.
image
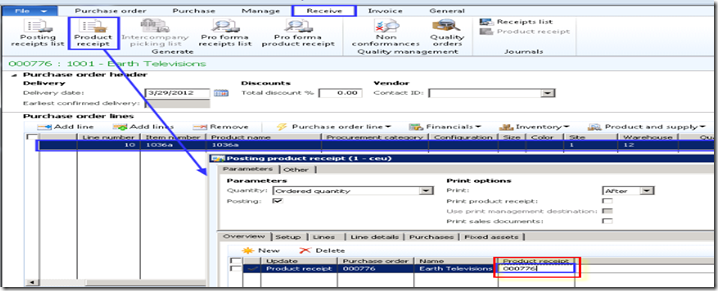
Post packing slip or Product receipt.
In Ax 2012 packing slip is called as Product receipt. But Packing slip name remains as same in Sales order process. To post Product receipt, Go to Purchase order form—> select Receive tab in Action pane—> select Product receipt icon as shown in below screenshot—> Posting Product receipt form opens—> Enter related number in Product receipt field –> Click Ok button.
image
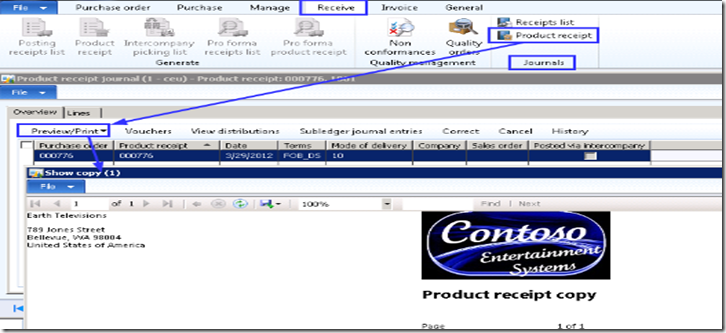
To view print preview of Product receipt copy. Go to Purchase order form—> Receive tab in action pane –> Select Product receipt in Journal group—> Product receipt journal opens –> click Preview/print icon—> select Copy if you want to print copy of an invoice or Original if you wish to print the original Invoice. 
image
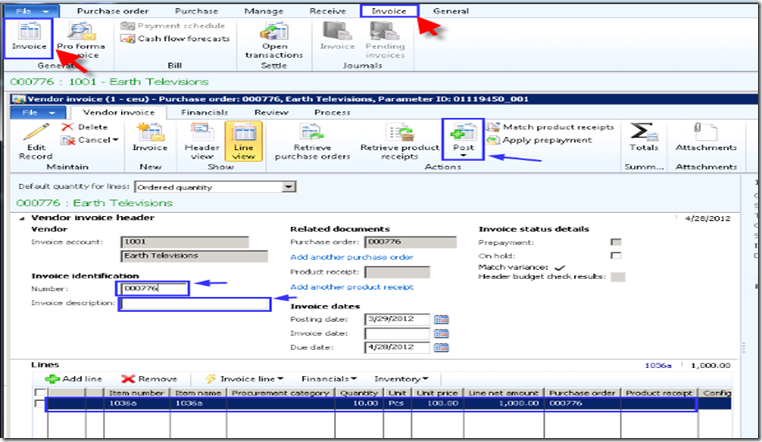
Now final step in Purchase order Posting Invoice
Go to Purchase order –> Invoice tab in action pane—> select Invoice icon in Generate group –> Vendor Invoice form is opened—> Select Vendor Invoice fast tab—> Enter Invoice number in Number field in Invoice identification section—> click Post icon in the ‘Actions’s group in action pane as shown in below screenshot
image
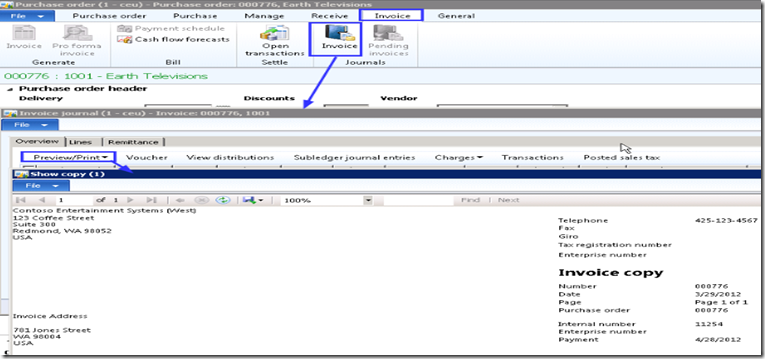
To view print preview of Invoice copy Go to purchase order form—> click Invoice tab on action pane—>select Invoice  option in Journals group—> Invoice journal form is opened –>select overview tab –> select Preview/ Print option—>select from Copy/original invoice as per your requirement—> preview the Invoice copy
image
Now we have covered all phases of Purchase order like Confirmation, Receipt list, Product receipt (Packing slip in 2009) and Invoice posting. This is a normal or simple Purchase cycle of an item in AX 2012.

How to cancel a Sales or Purchase orders in MS Dynamics AX 2012

How to cancel a Sales or Purchase orders or How to get cancel status to a Sales order or Purchase order in MS Dynamics AX 2012

Hi All,
we are going to discuss about how to cancel a sales or Purchase order. If a Sales order or Purchase order  gets a Cancelled status if it is cancelled in below way.
Here let us take example of Sales order cancellation process and same process holds for Purchase order also.
First create a new sales order and have one sales line for example.
image
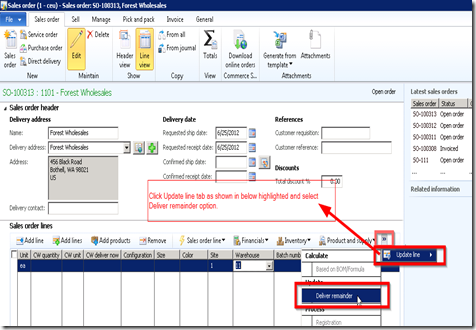
Go to Sales order –> select sales line—> click Update line as shown in the below screenshot—> select Deliver remainder
image
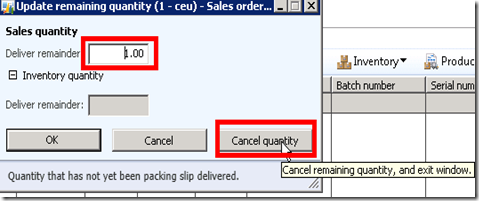
New Update remainging quantity form is opened—> Click Cancel quantity button as shown in below screenshot.
image
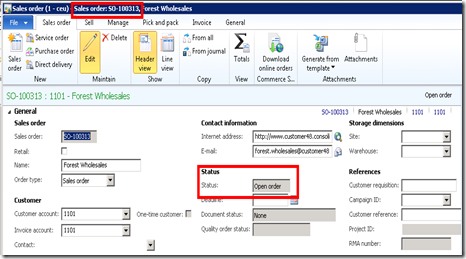
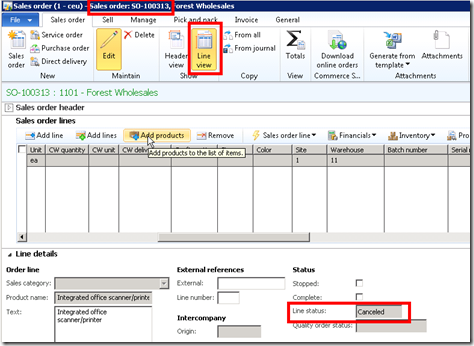
once you perform this for a single line where no items are not delivered then automatically sales line status will be changed to Cancelled as shown in below screenshot.
image
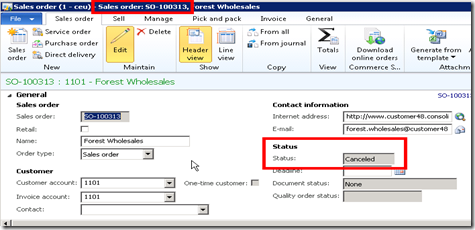
Once you perform this for all lines which are not processed (means no items were delivered from all the lines) then automatically sales order header status will be changed to Cancelled as shown in below screenshot.
image
About these ads

Sunday, 15 February 2015

Item model groups AX 2012

Item model groups (form) [AX 2012]


Click Inventory management > Setup > Inventory > Item model groups.


Use this form to create and maintain item model groups. These groups contain settings that determine how items are controlled and handled on item receipts and issues. The settings also determine how the consumption of an item or items is calculated. A single model group can be associated with many items. Therefore, maintenance is easier, because you can control many items by using the same setup.
NoteNote
When you set up and assign item model groups to products, be aware of the restrictions that may apply if you change the setup. If a product has open transactions, you might receive a warning and be unable to complete the following tasks:
A descriptive name for the item model group.

Stocked product:
Select this check box to indicate that the product should be handled in inventory. Products that are handled in inventory generate inventory transactions. These products can be included in cost calculations. On-hand quantities can also be maintained for these products.
NoteNote
Stocked products include items and services. A service cannot be added to stock. However, Microsoft Dynamics AX requires that pro forma stock transactions be generated for services that contribute to the inventory value of tangible goods. For example, pro forma stock transactions must be generated if a service is used to subcontract production steps.

Physical negative inventory
Select this check box to enable negative physical inventory for the item model group.
NoteNote
Microsoft Dynamics AX does not verify that items are physically in inventory when items are picked.
Example
Production is started, but not all items for the production are in inventory. The items have been ordered, and delivery has been scheduled. Alternatively, an order for an item is updated. Even though the item is not in inventory, it has been purchased and will soon be in inventory.

Financial negative inventory
Select this check box to enable negative financial inventory for the item model group.
Negative financial inventory is often used for services. If the check box is cleared, the cost price must be known for the quantity that is financially pulled from inventory.
Example
Eight items are invoice-updated, and five other items are packing slip–updated. Therefore, the physical on-hand inventory is 13. If this check box is cleared, negative financial inventory is not enabled. Therefore, only eight items are available when a sales order is invoice-updated, even though 13 items are available in on-hand inventory.

Quarantine management
Select this check box to indicate that items that are associated with the item model group are subject to the rules and requirements for quarantine management.
This check box is used for items that are set aside and awaiting approval for distribution.
If the check box is cleared, items are not under quarantine management, unless a quarantine order is created manually in the Quarantine orders form.
When the item is registered, a quarantine order is generated. This quarantine order has a status of Started.

Consolidated picking method
Select this check box to pick multiple orders, and to use picking areas and shipment functionality.

Post physical inventory
Select this check box to post physical item transactions in the ledger.
The physical item transactions are posted as follows:
Packing slips and product receipts are posted if the Post product receipt in ledger check box is selected in the Accounts payable parameters form, or if the Post packing slip in ledger check box is selected in the Accounts receivable parameters form.
Production orders that are reported as finished are posted if the Post report as finished in ledger check box is selected in the Production control parameters form.
If the check box is cleared, packing slips, product receipts, and production orders that are reported as finished are not posted in the ledger, regardless of the settings in the parameter setup forms.

Post financial inventory
Select this check box to post the updated financial value of items in the ledger.
When a purchase order is invoice-updated, the value of the items is posted to the inventory receipt account. When a sales order is invoice-updated, the value of the items is posted to the inventory issue and the consumption accounts. The inventory value that is posted can then be reconciled with the related status accounts in General ledger.
If the check box is cleared, when a purchase order is invoice-updated, the value of the items is posted to the item consumption account, but not to the inventory receipt account. When a sales order is invoice-updated, no posting occurs in the item consumption account or the issue account.
NoteNote
Clear this check box for service items if the item consumption should not be posted when sales orders are invoiced.
When the check box is cleared, the journal lines for the items do not generate ledger postings.

Post to Deferred Revenue Account on Sales Delivery
Select this check box to accrue the estimated revenue for the delivered quantity of packing slip updates. The accrued revenue that is accounted on the sales delivery is offset when the customer is invoiced for the delivery.

Accrue liability on product receipt
Select this check box to accrue the estimated expense for packing slip updates to the general ledger.

Registration requirements
Select this check box to indicate that item receipts must be registered before inventory is physically updated.
The status of the inventory transaction for the item receipt must be Registered before the item's product receipt is updated.
This field is used by warehouse management. Registered items are part of physical inventory. You can register items in the warehouse management journals. Alternatively, you can click Inventory, and then click Registration on the relevant journals and orders.

Receiving requirements
Select this check box to indicate that item receipts must be physically updated before they can be financially updated.
NoteNote
If you post a vendor invoice, a product receipt must be entered and posted before the vendor invoice for the product receipt can be posted. The received quantity on the product receipt might differ from the invoiced quantity. In this case, an icon is displayed in the Product receipt quantity match field in the Vendor invoice form. For more information, see Vendor invoice (form) and Set up Accounts payable invoice matching.

Picking requirements
Select this check box to indicate that item issues must be picked before inventory is physically updated.
The status of the inventory transactions for the item issue must be Picked before the packing slip is updated.
This field is used by warehouse management. Picked items are part of physical inventory. Items can be picked in the warehouse management system by dispatches and picking routes. Alternatively, you can click Inventory, and then click Registration on the relevant journals and orders.
NoteNote
If you create a direct delivery from a sales order, the Picking requirements parameter is ignored, because items are transferred directly from the vendor to the customer. These items do not physically come into your company.

Deduction requirements
Select this check box to indicate that item deductions must be physically updated before they can be financially updated.
NoteNote
If you post a vendor invoice, a product receipt must be entered and posted before the vendor invoice for the product receipt can be posted. The deducted quantity on the product receipt might differ from the negative invoiced quantity. In this case, an icon is displayed in the Product receipt quantity match field in the Vendor invoice form. For more information, see Vendor invoice (form) and Set up Accounts payable invoice matching.
Backward from ship date
Select this check box to reserve expected receipts, such as open purchase order lines, that have a date of receipt that is nearest to the delivery date of the sales order. If the check box is cleared, incoming inventory transactions that have the earliest date of receipt are reserved.
NoteNote
Items that are available in inventory are not controlled by the Backward from ship date parameter. To control the available inventory that is reserved, you can use dimensions, such as corresponding batch numbers. Alternatively, you can mark orders. For more information about how to mark orders, see Mark orders.

Inventory model
Select the inventory model that is used to close and perform adjustments in the Closing and adjustment form.
Include physical value
Select this check box to indicate that transactions that are physically updated should be included in the calculation of the average cost.
At inventory close, this parameter may be used, depending on the method that is used for inventory valuation.
The following inventory valuation methods use this parameter during inventory close:
FIFO
LIFO
LIFO date
The following inventory valuation methods do not use this parameter during inventory close:
Weighted avg.
Weighted avg. date

Fixed receipt price
Select this check box to adjust issues and receipts to a fixed receipt price.
The fixed receipt price is a principle for inventory valuation that sets the price of receipts to the active planned cost or basic cost of a product.
TipTip
The fixed receipt price is defined in the Price field on the Manage costs tab in the Released product details form.
When the check box is selected, receipts and issues are posted as follows:
Purchase receipts – Posting occurs at the actual cost.
Purchase invoices – The price difference between the actual cost and the fixed receipt price is posted to the general ledger as a variance. The amount is posted to the loss or profit account for the fixed receipt price. Inventory is updated based on the fixed receipt price.

Sales order packing slips and sales invoices – Posting occurs at the estimated cost.
When you run an inventory close or a recalculation, if this check box is selected, the value of issue transactions is adjusted according to the price that is specified in the Price field. If this check box is cleared, the value of issue transactions is not adjusted according to this price.
NoteNote
If the fixed receipt price is changed, and you want all new issue transactions to use the new cost, follow these steps:
Run an inventory close.
Adjust the balance for the on-hand inventory, so that the balance matches the new cost.

Activate a new planned cost.

Thursday, 12 February 2015

Creation of Dimension Groups in MS Dynamics AX 2012

Creation of Dimension Groups in MS Dynamics AX 2012


In MS Dynamics AX 2012 the item dimension group is divided into three Product dimension groups:
They are
1) Product Dimension group
2) Storage Dimension group
3) Tracking Dimension group
1. Product Dimension Group – contains the item dimensions (Configuration, size and color) as in the AX 2009. In 2012 we have two types of items – Product and Product Master.
2. Product dimension group can only be selected for Product Master Type of Items. (explained in detailed in another topic in my blog)
3. Storage Dimension Group – contains all the dimensions related to storage of an item or product (site, warehouse, location and pallet id).
4. Tracking Dimension Group – contains serial number and batch number setup.
Product dimension group creation
· To create a new Product Dimension Group
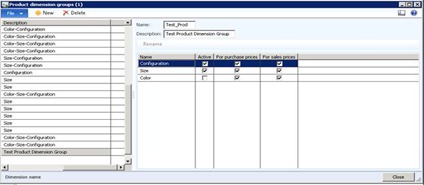
· Navigate to Product information management -> Setup -> Dimension groups -> Product dimension groups.
clip_image002
· Click the New button option on the bar.
· Enter Name as ‘Test_Prod’.
· Enter Description as ‘Test Product Dimension Group’.
· Click on ‘Active’ check box beside the Product dimension you want to as shown in the above figure to activate the Product Dimensions
Storage dimension group creation
· To open Storage Dimension Group form
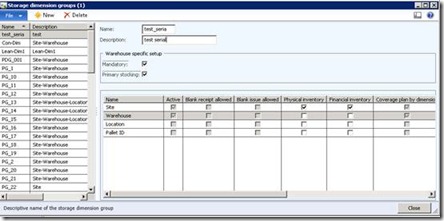
· Navigate to Product information management -> Setup -> Dimension groups -> Storage dimension groups.
clip_image004
· Click the New button to create a new storage dimension group.
· Enter Name as desired say ‘Test_Stor’.
· Enter Description as ‘Test Storage Group’.
· To make warehouse a mandatory, then select Mandatory check box.
· To make Primary stocking active for warehouse then select the ‘Primary stocking’ check box.
· To activate a dimension select ‘Active’ check box for that particular dimension.
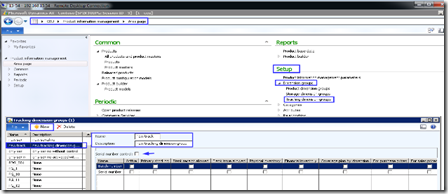
Tracking dimension group creation
· To open Tracking dimension group form
· Navigate to Product information management -> Setup -> Dimension groups -> Tracking dimension groups.
clip_image005
· Click “New” button.
· Enter Name, say ‘test_track’.
· Enter Description as ‘Test Tracking Dimension group’.
· Click on ‘Active’ check box to activate the serial/batch number. dimension
· To activate serial number control (a unique serial number can only be entered) select ‘Serial number control’ check box.
Assigning the Dimension groups to a new product of type Product Master
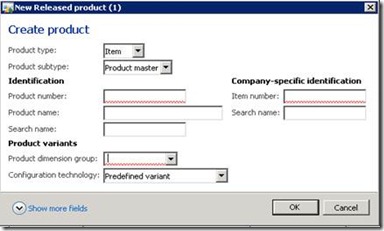
· To create a product for a single company or entity go to Product information management -> Common -> Released products.
· Click the Product -> New -> Product button.
clip_image007
· Select Product subtype as ‘Product master’.
· Enter Product number, say ‘Test_Dimes_setup’.
· For a Product Master type of item, it is mandatory to assign a Product Dimension Group while creating that Product Master.
· Click the OK button.
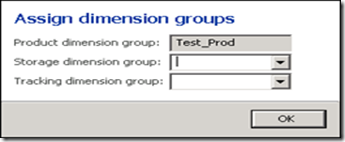
· To Assign Tracking and Storage Dimension Groups click the Product -> Set up -> Dimension group button.
clip_image009
· Select ‘Test_Stor’ as Storage Dimension Group from the drop down.
· Select ‘test_track’ as Tracking Dimension Group from the dropdown.
· Click the OK button.
· Save Released product details form.
Create Product Dimensions
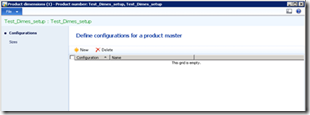
· To open Product Dimension form
· Navigate to Released Product details form -> Product Tab -> ‘Product master’ action group -> ‘Product dimensions’ button.
clip_image011
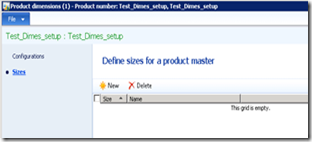
· As we have only selected Configurations and size in the Product Dimension Group, we can only see these two Dimensions in the Product Dimension form.
· Now click on ‘New’ Button to create a new configuration.
· Enter the Configuration and description of that particular configuration.
· Click on ‘size’ to create ‘Size’ dimension option
· Follow the same procedure followed for Configuration creation to create new ‘Sizes’.
clip_image013
· Save the Product dimensions form.
Creating Product Variants
· In AX 2009, there is a concept called Item Dimension combinations. An item must have item dimension combinations created in order to process items with item dimensions. The same concept is renamed as Product Variants in AX 2012.
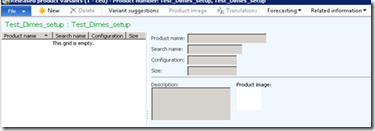
· To create Product Variants for a product go to Released Product form ->Product Tab -> ‘Product master’ action group -> ‘Released product variants’ button.
clip_image015
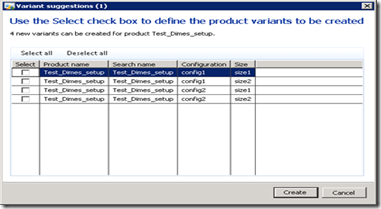
· Clicking on the Variant suggestions button will show all the possible combinations of Configurations and Sizes.
clip_image017
· Click the Select all button to select all the combinations or else you can select required combinations and then click on Create button.
· All the Product Variants are created.