After you create a workbook, you can publish to Tableau Server or Tableau Online by following the steps below.
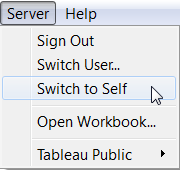
If you sign in as a different user and then need to sign back in as yourself, on the Server menu, click Switch to Self.
- Select Server > Publish Workbook.

If you are not already signed in to Tableau Server, you will see the Tableau Server Sign In dialog box.
- Enter the server name or URL (for example, sales_server, or https://sales_server).
To sign in to Tableau Online, enterhttps://online.tableau.com.
Click Connect.

If Tableau Server is Kerberos-enabled and you are on a machine with valid Active Directory credentials, you will connect automatically to the server. In this case, you can skip step 3. If Kerberos authentication fails, you will be prompted to provide a user name and password for authentication. If you need to change the user you're signed in as, see Switch Kerberos User.
- Next, enter your user name for Tableau Server on-premise or email address for Tableau Online, enter your password, and then click Sign In.

If Tableau Server on-premise is configured to use Active Directory, enter your Windows user name (the domain is not required—except in multi-domain environments where the user is not in the default domain); otherwise, enter your Tableau Server user name.
If Tableau Server is configured to use SAML for user authentication, you won't see the above dialog box. Instead, you'll see a sign in prompt from an external identity provider.
- In the Publish Workbook to Tableau Server dialog box, specify the following:
- Project: A project is like a folder that can contain workbooks and data sources. The default project on Tableau Server is named Default. All workbooks must be published into a project.
- Name: Provide a name for the workbook in the Name text box.
You can use the drop-down list to select an existing workbook on the server. In this case, the workbook on the server is overwritten. To do this, you must have the Write permission for the workbook on the server.
- Add Tags: You can enter one or more keywords that describe the workbook into the Tags text box. Tags help users find related workbooks when browsing the server.
Multiple tags should be separated using either a comma or a space. If any of the tags contains a space, use quotations (e.g., “Sales Quotes”).

- Project: A project is like a folder that can contain workbooks and data sources. The default project on Tableau Server is named Default. All workbooks must be published into a project.
- You can specify permissions to allow or deny access to the workbook on the server.
By default all users can interact with the workbook and you, as the publisher, have all permissions. See Setting Permissions for details, and see Permissions for information on the different permissions you can assign to users and groups.
- Under Views to Share, select the sheets you want to share on Tableau Server. Any sheets that are not selected are hidden on the server.
Showing and hiding worksheets is useful when you want to publish a dashboard or story without publishing the worksheets that were used to create that dashboard or story. For example, when you publish a workbook that has several worksheets and a summary dashboard, you can select to hide the individual worksheets and only show the dashboard. Remember though, that anyone allowed the Download/Web Save As permission can download the workbook from the server and then access the hidden worksheets. So hiding worksheets is not a secure way of concealing information.
Hidden sheets can still be accessed when a workbook is opened from the server using Tableau Professional. Users must be given the Download/Web Save As permission to open the workbook from the server. Hidden sheets can also be used by users with appropriate credentials from edit mode . See Edit and Create Views in the Tableau Server help.
- Select whether to Show Sheets as Tabs.
When this option is selected, all workbook sheets are displayed on a row of tabs in each individual view. Users can then click to see the other views in the workbook.
When you select this option, all the sheets are shown regardless of any sheet level permissions you may have already set up. If you want to enforce sheet level security, you should make sure the Show Sheets as Tabs option is cleared. - Select whether to Show Selections. When this option is selected, any selections you’ve made in the workbook will be published to the server.
- Select whether to Include External Files. When you include external files, a copy of any referenced external file data sources or background images are published along with the workbook. External files include Excel, Text, Data Extract, and image files. If you don’t include these files, others may not be able to see the worksheets online.If you are publishing to an on-premise Tableau Server, and the workbook references data sources or images on a mapped drive, be sure to check Include External Files. If you do not want to publish the external files to the server, for example because you want to preserve a live connection to a file-based data source after publishing to Tableau Server, change the connection information so that the workbook references a full UNC path. For example rather than connecting to D:\datasource.xls, you would connect to \\filesrv\datasource.xls.
If you are publishing to Tableau Online, and the workbook connects to a data source other than Google BigQuery or Amazon Redshift, you will need to include external files.
- Optionally, click Scheduling and Authentication. Decide whether to embed user names and passwords, so that server users won’t have to have an account on the database to see the views. For information about embedding passwords, see Embedding Passwords and Authentication.
If the workbook uses Extract connections you can optionally add the workbook to a refresh schedule.
- Click Publish.
Note: When publishing a single worksheet in a workbook containing multiple data sources, each data source, regardless of whether or not it is active in the worksheet, may require authentication.
Switch Kerberos User
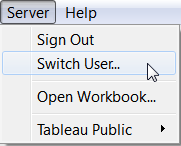
If you're in a Kerberos environment and you need to change the user you're signed in as on Tableau Server (typically for testing purposes), on the Server menu, click Switch User. Note: If the Switch User option is not displayed on the server menu, the Tableau Server you are connected to may not be configured for Kerberos single sign-on (SSO).
Selecting Switch User opens the Tableau Server Sign In dialog box. You can sign in with a different user name and password. The Tableau Desktop status bar will reflect the user name change.If you sign in as a different user and then need to sign back in as yourself, on the Server menu, click Switch to Self.
No comments:
Post a Comment