Creation and Posting of Inventory adjustment Journal in AX 2012
Hi All,
In this topic now I am going to explain importance and Creation & Posting of Inventory adjustment journal in Microsoft Dynamics AX 2012.
The Inventory adjustment or Profit/Loss journal is generally used to write-off inventory or to make standard adjustments. It is an inventory adjustment journal for items lost, broken, or just found where item value and quantity must be updated to keep inventory accuracy. This kind of journal automatically applies financial transactions to preset accounts for profit and loss. This journal was known as Profit and Loss journal in earlier versions of AX prior to AX 2012.
To create and post Inventory adjustment journal follow below navigation.
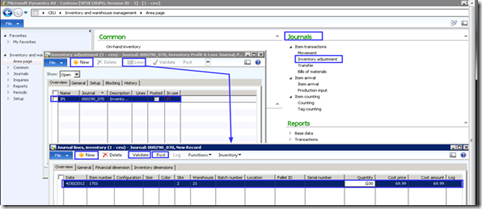
Navigate to Inventory and warehouse management –>journals—> Item transactions —>Inventory adjustment
Click “New” tab on the Inventory adjustment journal form as shown in above screenshot
Select a Journal name as required say “IPL” from above screenshot.
Click Lines button the same form as shown in the above screenshot.
A new journal lines form is opened,
Select item number in the Item number field.
Enter if required dimensions like Item (Configuration, Size and Color),
Enter if required Storage dimensions like Site, Warehouse, Location and Pallet ID. (Warehouse is mandatory, Site is required if Site is activated).
Enter if required tracking dimensions like Serial and Batch number.
Enter some value in Quantity field.
If you are going to add or intake the inventory you need to put positive value in the Quantity field. If the value is positive you can edit the value displayed in Cost amount field as shown in below field.
If you want to remove or outtake or decrease inventory you need to put negative value in the Quantity field. Here you can’t edit the values displayed in Cost amount field.
Now if require adding some more items create another line and enter all related values in related fields.
Now journal is ready to post.
Click Validate tab in the top of the form and click OK option shown in above screenshot
If you get any Warning or Information or Error logs please address them and proceed for Posting
To post the journal, click Post tab on the top of the form and click OK in the Posting form.
Now you will see an information log as Journal is posted successfully


No comments:
Post a Comment